Our body naturally starts losing muscle mass starting from age 30. If we don't workout we lose between 3-5 % of muscle mass per decade, leading to a muscle loss of up to 40% when we turn 70. To prevent this muscle loss we can do regular exercises that are focused on our muscles. Especially resistance/strength training has shown to increase muscle mass and prevent muscle loss.
In this blogpost I will share which muscles tend to weaken naturally and discuss some strengthening exercises that will help these muscles.
Category of Muscles
Our body is made up of over 600 muscles. In the late 1960s a Czech scientist named Dr. Vladimir Janda discovered that some of these muscles seem to be almost always active, while others seem to only get active when we make movements related to those muscles. He categorised the always active ones as postural muscles (also called tonic muscles) and the on-demand active ones as phasic muscles. Let's look into them a bit more.
Postural or Tonic Muscles
- Postural muscles are active most of the time and are needed for our body to keep its posture/stay upright.
- They have relatively more slow-twitch muscle fibres compared to Phasic muscles. These slow-twitch fibres help a muscle endure longer periods of usage without getting fatigued.
- Postural muscles tend to shorten in length more easily and get tightened.
- They lose muscle mass slowly compared to Phasic muscles.
- Phasic muscles are predominantly used to support movements of our body.
- They have relatively more fast-twitch muscle fibres compared to Postural muscles. These type of fibres can create an outburst of energy in a very short timespan, which supports the muscles during quick movements. However they get tired a lot faster compared to slow-twitch muscles, which can endure longer usage.
- Phasic muscles tend to weaken and increase in length when they are not used.
- They lose muscle mass faster compared to Postural/Tonic muscles.
Even though each muscle has both fast-twitch and slow-twitch muscle fibres, their percentage in our muscles vary depending on their function - whether the muscle is used for posture or for movements.
Naturally, tonic or postural muscles tend to shorten and phasic muscles get weaker and increase in length. To prevent the shortening of postural muscles we need to stretch them regularly. Here are some stretching exercises I shared in my previous blogpost.
To stop phasic muscles from getting weak and losing muscle mass, we need to do strengthening exercises with these muscles.
Before getting into the exercise part I want to give an overview of major phasic/weakening muscles.
List of weakening muscles
- Muscles of the Arm
- Triceps
- Wrist & Finger Extensors
- Muscles of the Shoulder and Upper Back
- Deltoid
- Trapezius (middle + lower part)
- Rhomboids
- Serratus Anterior
- Deep Cervical Flexors
- Supraspinatus
- Infraspinatus
- Lower back and Abdominal muscles
- Thoracic Erector Spinae
- Rectus Abdominis
- Transversus Abdominus
- Muscles of the Thigh and Buttocks
- Vastus Lateralis
- Vastus Medialis
- Gluteal Muscles
- Muscles of the Lower leg
- Tibialis Anterior
- Peroneal / Fibularis
- Toe Extensors
Exercises for weakening muscles
I am sharing 8 exercises below that focus primarily on strengthening the weakening muscles listed above.
Before you begin these exercises, here are a few things for you to consider:
- It would be highly beneficial if you do these exercises 3 times a week (on alternate days with a two day break once)
- If possible, try to do two rounds of all 8 exercises with a short break of 3 minutes in between the two rounds.
- It helps your muscles to warm-up before you begin this exercise routine. If possible, warm up by walking or running slowly for 5 minutes. If you can't go outdoors, you can also do marching movements indoors with your hands and legs for 5 minutes.
- Take a 30 second break between two exercises.
 |
| Squats - Starting position |
 |
| Squats - workout position |
- Stand with your feet apart a bit wider than your hips (picture 1).
- Hold your arms towards the front of your chest to balance your body weight.
- Slowly bend your knees and lower your back towards the ground.
- Make sure your hips are moving backwards when your back is moving down, and try to keep your back straight (not arched) (picture 2).
- Make sure your knees stay behind your toes, so there is not too much pressure on your knees (picture 2).
- Slowly bring your back up again.
- Repeat the above steps 15-20 times. Breathe in while coming down and breathe out while standing up.
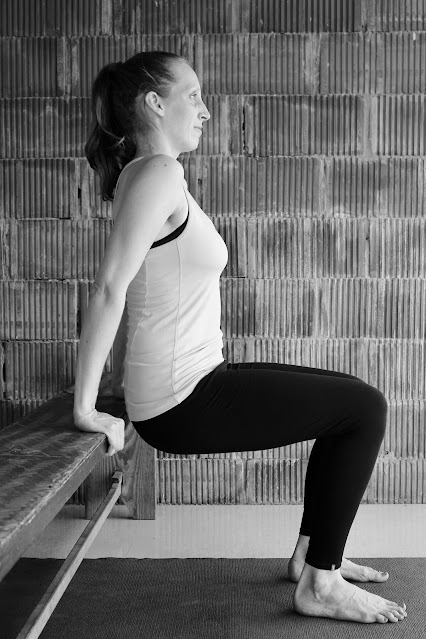 |
| Dips - Starting position |
 |
| Dips - workout position |
- Start on the edge of a bench, chair or bed with your arms straight and holding onto the edge (picture 1).
- Your knees are bent at 90°and your feet are below your knees (picture 1).
- Slowly move your upper body downwards towards the ground (picture 2).
- Then use your arms to lift your body back up to the starting position.
- Repeat 15-20 times. Breathe in while coming down and breathe out while coming up.
Exercise 3 - Bridge
 |
| Bridge - starting position |
 |
| Bridge - holding position |
- Lie down on your back with your knees bent and your feet on the floor (picture 1).
- Your arms are extended next to your body with palms facing down.
- Slowly lift your hips as far up as you can.
- Hold this position for 20-30 seconds.
- Keep breathing in and out while holding this position.
Exercise 4 - Prone Front Rowing
 |
| Prone Front Rowing - starting position |
 |
| Prone Front Rowing - front arm position |
 |
| Prone Front Rowing - rowing back arm position |
- Lie down on your stomach with your arms at a 90° angle from your body with your palms facing down (picture 1).
- Lift up your upper body and extend your arms to the front (see picture 2).
- Pull your elbows backwards as far as you can with your fingers still pointing forward (picture 3).
- Stay up with your upper body and repeat 15-20 times. Breathe in as you extend your arms to the front and breathe out when you pull them back.
Exercise 5 - Prone Arm Lifts
 |
| Prone Arm Lifts - Starting position |
 |
| Prone Arm Lifts - workout position |
- Lie down on your stomach with your arms extended to the side at a 90° angle, and palms facing down (picture 1).
- Lift up your arms (keeping them straight) and turn your palms towards your head (picture 2).
- Lower your arms and bring them close to the floor without touching it. Palms are still facing forward.
- Continue moving your arms up and down for 15-20 times without them touching the floor.
- Breathe in while bringing the arms up and breathe out while bringing them down.
Exercise 6 - Straight Crunches
 |
| Crunches - Starting position |
 |
| Crunches - workout position |
- Lie down on your back with your knees bent and your feet on the ground (picture 1).
- Keep your hands on the side of your head (picture 1).
- Slowly lift your head and shoulders and move them towards your chest (picture 2).
- Slowly lower your head and shoulders back (picture 1).
- Repeat 15-20 times. Breathe out while lifting your head up and breathe in while lowering your head.
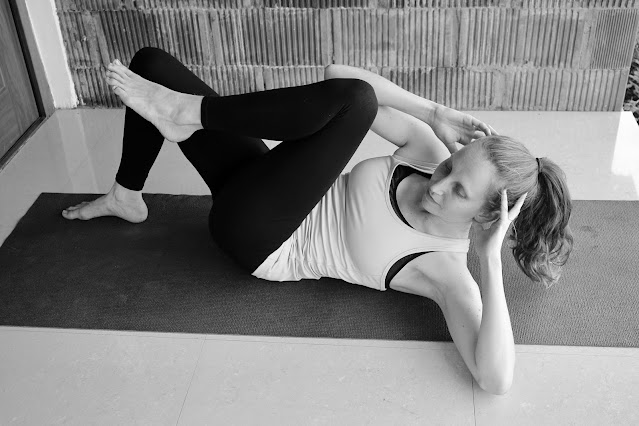
Exercise 7 - Cross crunches
 |
| Cross crunches - starting position |
 |
| Cross crunches - workout position 1st side |
 |
| Cross crunches - workout position 2nd side |
- Lie down on your back with you knees bent and your feet on the floor (picture 1).
- Keep your hands on the side of your head (picture 1).
- Bring your right elbow & right shoulder towards your left knee while bringing the left knee towards your face (picture 2).
- Lower your knee, and bring the shoulder, elbow and head back to the floor (picture 1).
- Repeat the exercise with your left elbow and shoulder, and right knee (picture 3).
- Repeat 15-20 times on each side. Breathe out while lifting your shoulders and elbows, and breathe in while lowering your shoulders, elbows and head.
 |
| Plank - holding position |
- Put your palms on the floor with straightened arms and stand on your toes keeping your body in a straight line (picture 1).
- Hold this position for 20-30 seconds or as long as you can hold it.
Once you finish these exercises make sure to drink plenty of fluids. For your next meal try and have a carbohydrates and protein rich meal to help your muscles replenish and build muscle mass.
Doing these exercises regularly will keep your muscles strong and minimizes the weakening of the muscles and losing muscle mass.
Stay healthy and enjoy finding joy in health!